
Swirly Rye Bread
The Basics
Beth, my wife, loves swirled rye breads, like Pepperidge Farm's Deli Swirl Bread Rye & Pump. There's something very attractive in the contrast between the dark and light rye breads. There's something vary flavorful in the taste contrasts as well. Am I the only kid on the block who tries to nibble on only one strand of the bread at a time? (I thought not.)
Some artisan bakers may look down their nose at this bread, but that's their loss. It's a fun bread, and no less valid than a Pain d'Epi or a couronne. What makes a bread an artisanal bread isn't its shape. What makes a bread an artisanal bread is the fact it was made by an artisan, by a craftsman.
As a baker, I'd rather have my family eat good home made breads, instead of mass-market breads. As mass market breads go, Pepperidge farms is decent, but I was pretty sure I, and you, could do better. Which is to say this is not an attempt to duplicate their bread, but an attempt to make a better bread that was inspired by this bread. I think it's pretty darn good.
I get a fair number of emails that complain that I talk too much. That I make things too hard to understand. And that they came here for recipes, not philosophy. If you are like those people, you might want to bail out now. This is about the design decisions and trade offs that led to the swirly rye bread I make. And the infinity rye bread. And the marbled rye bread.
The first design decision was what bread doughs to swirl. To start with, the two rye breads have to be fairly similar or they won't bond well or rise together. The best - or at least the easiest - place to start is with a known good recipe, and then tweak it as needed. Beth already likes my Bohemian Rye bread and the New Bohemian Rye bread that is related to it, so those are great starting points. We need to lighten it up a bit to make it have good contrast to the darker loaf. We can do that by using a light rye flour, or less medium rye flour. I want the light strand to still deliver flavor and punch, so it should get a good dose of caraway seeds. We also need to make a variant that is bit darker and heartier for the dark strands. We can use medium or dark rye flour in this loaf to deliver more rye flavor and color, then add some cocoa and molasses to kick it up a bit more.
However, the difference has to be largely an apparent difference. If one strand is a very dense bread and the other a light bread, gaps will develop between the layers. So, we start with two similar rye breads.
I call the lighter bread Light American Rye because it clearly isn't a Jewish, German, Russian or Scandanavian rye. And I call the darker one Dark American rye.
I don't call the darker bread "pumpernickel" for two reasons. First, it's not pumpernickel. And second, Samartha would kill me. (Not really, Samartha is one of the nicest people I know. But he would have words with me.) What passes for pumpernickel in this country is nothing like the real thing. That isn't to say it isn't a good bread, it's just not pumpernickel. A true pumpernickel is a very, very dense bread made from rye flour, salt and water. Some bakers use sourdough to leaven them, some let the bread rise on its own. And, no matter what the leaven, it won't rise much. It isn't supposed to. Notice the lack of cocoa and molasses? The dark color comes from a long slow bake at low temperatures. Typically, about 24 hours at 250 F. With the pan of dough in a water bath. The colors come from cararmelization of the sugars in the dough and the maillard reaction. When immigrants asked American bakers for a dark bread, the American bakers did what they could, and the American dark rye bread was born. Enough history... back to swirly rye bread.
Both breads are just fine by themselves. If you want a loaf of a light rye, just make the light bread. If you want a loaf of dark rye, just make the dark rye bread recipe.
And that brings us to Rye Starters. Go on to the next tab.
Rye Starters
If you are used to working with wheat flour, as you move into rye breads you'll feel like Alice in Wonderland. As the Firesign Theatre titled one of their album's, "Everything You Know is Wrong!" Several times in this page we'll talk about how rye and wheat are different. Also, we'll be posting breads with more rye and less wheat flour in weeks to come.
While rye flour has gluten, it doesn't have much of it, and that gluten is of low quality. To get rye flour to make a loaf, you need to work with it a lot more than you would with wheat flour. One technique is to use a mix of wheat and rye flour. If the rye flour is less than about 30%, you can treat the loaf as a wheat bread, which is what it essentially is. After that, the baker depends on a gelatin in rye flour called pentosan to form the loaf. However, to be effective, pentosans need to be acidified. Traditionally, that is done with (brace yourself for a surprise) sourdough. Too many modern bakeries acidify the dough by adding different acids, such as acetic acid (vinegar) or lactic acid. However, for my money and my tastebuds, sourdough makes the BEST rye breads.
As a rule of thumb, you should acidify at least a third of the rye flour in the loaf. And that brings us to rye sourdough starters. Your rye bread really starts with your starter.
We'll talk about two starters in the tabs below. If you have an active rye starter, you can skip all the stuff below and go on to the American Light Rye tab. If not, you need to switch your starter to rye, activate your starter, or both. We have two approaches, and both work. One is our regular starter, just fed on rye flour. This approach works, and works well. However, I am coming to prefer the Detmolder Three Stage process for rye breads, and it is detailed in it's own tab.
To help people who prefer not to get into the Detmolder three stage starter, both recipes let you use either a Detmolder rye starter or a regular rye starter. To make the recipes work out correctly, we start by mixing starter and water together. The amounts are intended to compensate for the differences in the hydration of the starters. If you download Mike's Bread Spreadsheets from our downloads page, the startercalc.xls file will help you calculate how to feed your starter to get the right amount of the right starter painlessly.
American Light Rye
Let's start with the American Light Rye bread. By itself, it's a great light rye bread. Start by mixing the starter and water, using either the Detmolder or Conventional starter column.
| Ingredient | Detmolder starter | Conventional Starter |
| Starter | 110 grams 1/2 cup - 1 TBSP |
144 grams 1/2 cup + 1 TBSP |
| Water | 240 grams 1 cup |
206 grams 1 cup - 2 TBSP |
Once the starter and water are mixed, add:
| Volumetric Measure (Cups) | Ingredient | Grams | Baker's Percentage |
| 1 TBSP + 1 tsp | Butter | 18 | 4.4% |
| 3 cups | Bread flour | 360 | 87% |
| 1/2 cup - 1 TBSP | Light or Medium Rye Flour | 54 | 13% |
| 1 1/2 tsp | Caraway Seeds | 9 | 2% |
| 1 1/4 tsp | Salt | 8 | 2% |

Use solid butter, cut into small pieces. Solid oils help dough structure more than liquid oils. I suggest using a mixer, rather than kneading by hand or using the stretch and fold technique. Knead for 5 minutes, let the dough rest for 5 minutes, and then knead for another 5 minutes.
Cover the dough and let it rest for 20 minutes or so. While the dough was being kneaded, you can measure the ingredients for the dark rye bread. While the first dough is resting, you can knead the second dough.
American Dark Rye
Making the Dark American Rye - start by mixing the Detmolder  or conventional starter with water:
| Ingredient | Detmolder starter | Conventional Starter |
| Starter | 110 grams 1/2 cup - 1 TBSP |
144 grams 1/2 cup + 1 TBSP |
| Water | 220 grams 1 cup |
186 grams 1 cup - 2 TBSP |
(Together, the water and starter are 79% as a Baker's percentage. )
Once the starter and water are mixed, add:
| Volumetric Measure (Cups) | Ingredient | Grams | Baker's Percentage |
| 1 TBSP + 1 tsp | Butter | 18 | 4.4% |
| 1 TBSP + 1 tsp | Molasses | 18 | 4.4% |
| 3 cups | Bread flour | 360 | 87% |
| 1/2 cup - 1 TBSP | Medium pr Dark Rye Flour | 54 | 13% |
| 2 tsp | Cocoa | 11 | 2.6% |
| 1 1/4 tsp | Salt | 8 | 2% |
 Use solid butter, cut into small pieces. Solid oils help dough structure more than liquid oils. I suggest using a mixer, rather than kneading by hand or using the stretch and fold technique. Knead for 5 minutes, let the dough rest for 5 minutes, and then knead for another 5 minutes.
Cover the dough and let it rest for 20 minutes or so.
Putting It All Together
At this point, you should have a light rye dough and a dark rye dough, so now it's time to play! You can make many variations on the theme, but we'll talk about a Swirly Rye, a Marbled Rye and what I am calling "Infinity Rye". (Infinity rye still needs some work.)
The key to the breads is the proportion of light to dark rye bread. Each bread is a little different. About the time the dark dough is done being kneaded, you can start dividing the light dough. And then you can go on to divide the dark dough.
The loaves you'll see in the tabs were made by students in one of our recent Bake With Mike rye breads classes. They should have rolled the dough out somewhat longer so we would have had more layers in the final loaf. This isn't a real problem, but it is worth mentioning. Enjoy! - And send us pictures!
When I first made swirly rye I thought using equal amounts of Take two pieces of the light dough, fashion them into a single piece of dough, and roll it so it is around 6 to 8" wide and 10 to 12" long. Roll the remaining piece of light dough into a piece about the same width and about 2" shorter. Repeat this process with the dark dough. Put the thicker light piece of dough in front of you with the smoother side down, and with the narrower sides nearest to and farthest When the loaves have risen, bake them for about 40 to 45 minutes in a 375 to 400F (190 to 205C) oven. This was inspired by a number of really dreadful cakes I've Once the first layer is in place, I added another layer, alternating the colors with the first layer. You can, of course, use more layers. Just play with the size of your loaf pan, and the size of your dough blobs. Remember to leave enough room for the dough to rise. You may notice a few odd lumps of dough that don't quite fit into the pattern. I had some leftover dough lumps and used them to fill in some of the larger holes in the checkerboard. They made the pattern a bit more irregular. Whether that is a good thing or a bad thing is an aesthetic judgement. If you want a smoother top, you could rub the surface with wet hands to smooth it out. I was trying for a cobbled and rustic look. Once the dough blobs are in place, cover the loaf and let it rise. When the loaves have risen, bake them for about 40 to 45 minutes in a 375 to 400F (190 to 205C) oven. The fever from an ear infection made me thing some wild The lessons of the swirly rye helped here, the outer layers need to be larger than the inner ones. A student in a rye class commented on the Fibonacci number. And that was the starting point for the dough ball sizes. One part for each of the center pieces, three parts for the infinity, and five for the outer loaf seemed to work pretty well, though I may tweak the numbers a bit. In particular, I'd increase the infinity a bit, and the outer layer considerably. Let's turn those numbers into Now we've created two mirror When the loaves have risen, bake them for about 40 to 45 minutes in a 375 to 400F (190 to 205C) oven. Well... this has been a rather long exposition on a single bread. What brought you to this page? The "Toy Story" reference? In any case, I hope the page has been helpful, and that you think that of other things you can do with these, and other contrasting, doughs. Maybe you could braid them? Or you could swirl them? Or you could make mystery, or surprise, rolls - would your guests be amused or put off by not knowing what is inside a roll? You could put other fillings in the rolls. Maybe cheese, sausages, hot peppers, Italian peppers. With, or without, contrasting doughs. As with all the recipes on this site, I hope you'll see it as a starting point, not something writ in stone. I strongly believe that a recipe isn't really yours until you change it and MAKE it yours. If you come up with any variations you really like, I hope you'll write me through the "Contact Us" page to share the ideas. And if you have pictures to share, I'd REALLY like to see them! {“0″:”html-lang-direction”,”1″:[“images-titles”,”1″],”2″:[“control-titles”,”5″],”3″:[“input-titles”,”4″],”4″:[“link-targets”,”2″],”5″:[“control-tabindex”,”6″],”timestamp”:1700377890}
Swirly Rye
 each dough was the way to go. However, the dough that was rolled into the center of the roll just took over the loaf visually. Playing with quantites showed that 2/3 of the dough should be in the outer layer, and 1/3 in the inner layer.
 To get this balance, I divide both the dark and light loaf into three equal sized chinks. With this recipe, that should be around 255 grams.
 from you. Put the thinner light piece of dough on top of the thicker dark piece of dough. Align them so that the top edges are lined up, and the sides are fairly close to being aligned. Roll the dough down towards you as you would with a jelly roll. When the dough is rolled, crimp the seam and the edges.
 Repeat this with the remaining three pieces of dough. Once rolled, you can either let it rise as a free-form loaf or put it into a bread pan and bake it as a pan loaf. Either way, cover the loaf and let it rise.
Marbled Rye
 "enjoyed" as well as monkey bread. I wanted a more rectangular series of rye blobs.
 So, I cut two half loaf sized dough blobs into cubes somewhere between 1/2 inch and an inch on a side.
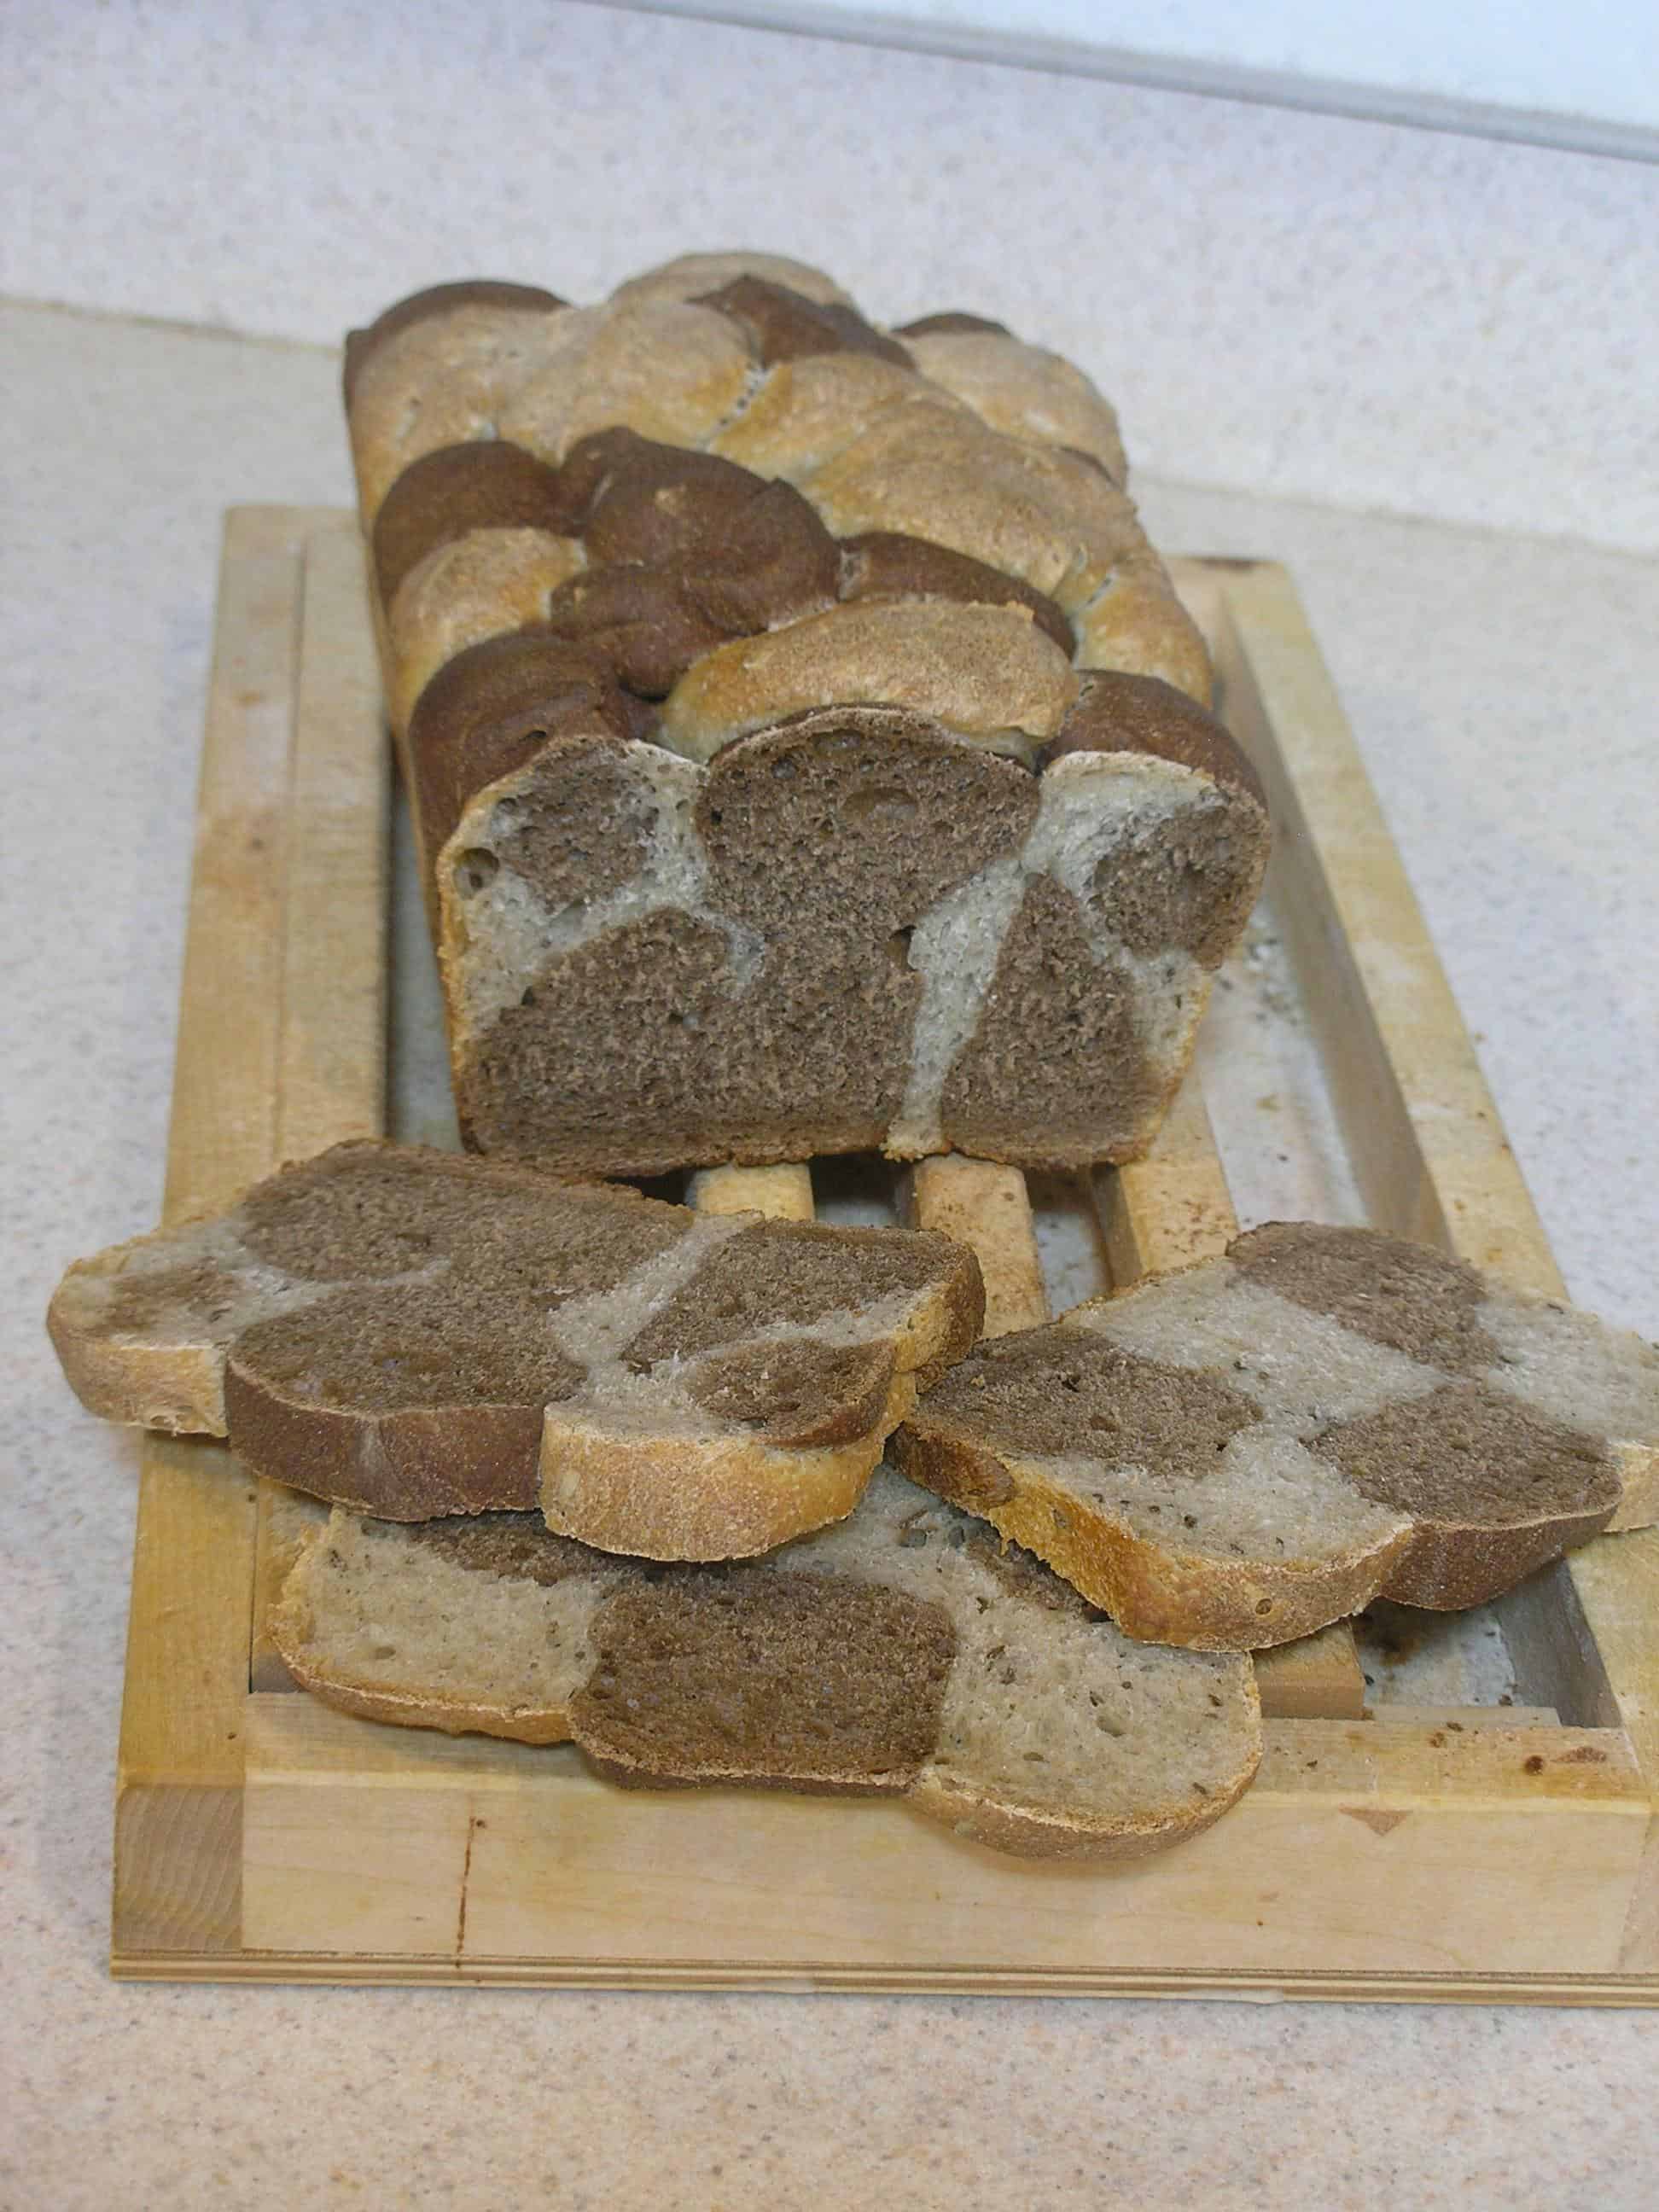
 The cubes of dough were put into a loaf pan in a checkerboard pattern. Unlike a monkey bread, the dough balls were not buttered. It is the butter in a monkey bread that lets you pull apart the baked dough balls. This time, we want a solid loaf of
 multi-colored bread,
To Infinity
 and crazy thoughts. Well, wild and crazy for me, anyway. I was thinking about multi-colored breads, I thought, yeah, how about baking an infinity sign into a loaf of bread?
 One color dough could be the centers of the infinity sign, another could be the infinity sign, and then we could surround that with central color. Yeah, what could go wrong with a fevered dream, brought to life in a medium as uncontrollable as bread dough?
 actual dough ball sizes. To make a 1 1/2 pound loaf we need about 770 grams of dough before baking. There are 10 parts of dough. 5 for the outer layer, 3 for the infinity, and 1 each for the two central parts. So, since 770/10 = 77, each part weighs 77 grams. That means we need two dough balls of 77 grams each, one dough ball of 231 (3 * 77) grams and one dough ball of 385(5 * 77) grams. And that's what we have in the picture above and to the right. The difference in size between the three and five part dough balls isn't terribly obvious in this picture.
 Next, I rolled the small dough balls into cigars about the length of the bread pan I was planning to use. Then, I rolled out the "infinity" dough balls and wrapped them around one of the cigars.
 After rolling the first cigar of dough, I put the second cigar into the infinity and wrapped it too.
 The infinity bundle then gets wrapped in the contrasting dough color.
 image loaves. It seems the cocoa in the dark dough makes that dough handle a bit better than the light dough, however both loaves bake up nicely. If you decided that you only want to make the loaf with the light, or dark, outer layer you could change the recipe sizes to get the appropriate amounts of dough. With the bakers percentages and ratios, it's pretty easy to set up a spreadsheet. If there are enough requests, I can set one up.
And Beyond!