
Sourdough Kaiser Rolls
Kaiser rolls are marvelous rolls. A crisp crust, a nice depth of flavor,  and a nice crumb make this a killer roll for great sandwiches, and a great bun for hamburgers. Far too many so-called Kaiser Rolls miss the mark - no crust, no flavor, and no real crumb. So, let's make something a lot closer to the real thing!
When we were running our bakery, we sold tons of these. I cannot remember, without wincing, how many nights were spent making endless Kaiser Rolls. One  of our customers, The Gas Cafe in Crested Butte, Colorado is known for having some of the best breakfast sandwiches and hamburgers in the state. One review in a big newspaper commented on how much their (OUR) rolls added to their hamburgers. Every time I've gone in there since we shut down the bakery Eric, the owner, has called me "Jerry" because he says I look like Jerry Garcia
 and asked if he can have some more Kaiser rolls. Sadly, I'm not sure if we ever made money on these rolls - without specialized machines to help make these rolls, the labor costs are pretty high.
This recipe is changed to sourdough from a yeasted recipe I saw in George Greenstein's "Secrets of a Jewish Baker."
This recipe is for 1 dozen 3 1/2 ounce Kaiser Rolls. 3 1/2 ounces is a great size for sandwiches and they can also be used as fabulous hamburger buns. Please be aware that the cups and gram measurements are approximations of one another. Most people who measure in grams do not want to weigh out 1,234 grams. 1,230 is close enough. Nor do people using cups want strange cup measurements like 3/16 cup. So, please don't think that, for example, 90 grams of flour is 1/2 cup.
Ingredients:
| Volumetric Measure (Cups) | Ingredient | Grams | Baker's Percentage (4) |
|---|---|---|---|
| 13/16 Cup (3/4 Cup + 1 TBSP) | Water | 210 Grams | 31.3% |
| 1 1/8 Cups | Active Sourdough Starter | 280 Grams | 41.8% |
| 2 Each | Large Eggs | 100 Grams | 15% |
| 2 TBSP | Light Olive Oil | 25 Grams | 3.7% |
| 5 1/2 Cups | Bread Flour | 670 Grams | 100% |
| 3 1/2 TBSP | Malt Extract | 28 Grams | 4.2% |
| 2 tsp | Salt | 13 Grams | 2% |
| 2 TBSP | Sugar | 32 Grams | 4.8% |
Mix the ingredients until they come together. At this point, you may use the stretch and fold process, or knead the dough.
To use the stretch and fold technique, stretch and fold the dough once an hour, and then let the dough rest for another hour. The dough will probably not rise much as each time the dough starts to rise we do another stretch and fold.
To develop the dough by kneading, knead for 5 minutes, cover the dough and allow it to rest for 5 minutes, and then knead for another 5 minutes. Once kneaded, cover the dough and let it rise until it has doubled in size.
Once the dough is developed, divide the the dough into 12 more or less equal sized pieces.
Roll the dough into balls as if you were forming little boules. There are two major ways to make the rolls. One is to pick up a dough ball and tuck the dough under the ball, which will tighten the dough on the surface of the ball. Keep turning the ball horizontally as you tuck the dough under. When the roll is a tight little dough ball, turn the ball over and pinch the seam under the dough ball together. This is a very good way of making a roll, but it takes two hands to do this, and it takes a bit of time.
Another way of making the rolls is to, well, roll the dough balls. Put the dough ball in a clean dry work surface. Move your hand down to the table. You want to have your little finger on one side of the dough ball and on the work surface. Your thumb needs to be along side the other side of the dough ball. Now, roll the dough ball between your little finger and thumb. You want to push the dough ball across the work surface so the dough will be pushed under the dough ball. Your hand, other than your little finger and thumb, need not - and should not - touch the dough ball. All the action is at the surface of the table, between the surface of the table, the dough ball, and your thumb and little finger. With practice, you can roll out a roll in each hand. Again, with practice, you can roll a dough ball in about 15 seconds.
As you form the rolls, set them aside and cover them so they won't dry 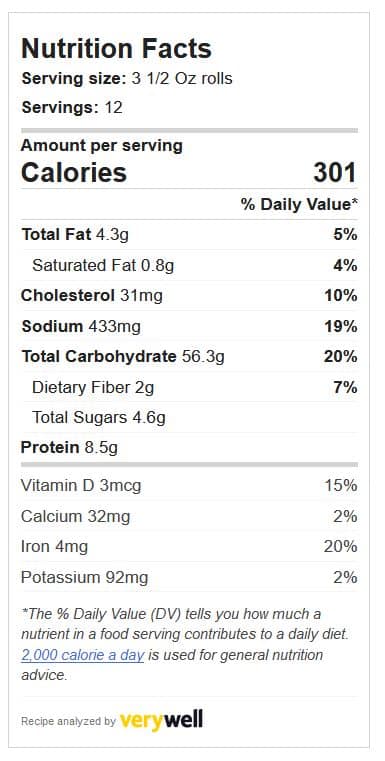 out and let the dough relax about 20 minutes. While the dough is relaxing, put a sheet of parchment paper onto a baking sheet. Once the dough has relaxed, it is time to take the steps needed to turn the roll into a Kaiser roll. In this area, we are going to take a shortcut. Classically, bakers rolled the dough balls into a flat circle, and carefully folded and sealed the dough into the classic cloverleaf shape. Sadly, this is hard to do and takes too long. Instead, we'll use a Kaiser roll stamp similar to the one at Amazon. You want one that is as wide as the rolls, and has a flat cutter. Stamps with a rounded bottom don't cut the rolls well, cutting too little on the edge of the roll. Using a stamp is a shortcut, and it does compromise the quality of the roll. However, you will still be making a roll head and shoulders above anything you are likely to be able to buy.
To use the stamp, start by dipping it in medium or light rye flour. This rye flour will help keep the cuts in the rolls from closing. Press down on the roll. As you press down, you will feel an increasing resistance as you press down. If you press a bit too far, the resistance will suddenly end and you will cut the roll into 5 pieces. You want to shoot for the point just before you cut the roll into pieces. Like riding a bicycle, this takes a bit of practice.
Now it's time to seed the rolls and let them rise. I press the cut side of the rolls into a dish of sesame seeds or poppy seeds. You may also use rock salt. Then put the rolls, cut side down, onto the parchment paper. Putting the rolls cut side down helps keep the cuts from closing. Cover the rolls and let them rise until doubled. You may refrigerate the rolls overnight before baking them which will enhance the flavor of the rolls. If you are planning on refrigerating the rolls, let them rise at room temperature for an hour before refrigerating them. This will let the rolls complete their rise in the refrigerator, so you can move the rolls almost directly from the refrigerator to the oven.
Pre-heat your oven to 425 F (220 Celsius). I strongly suggest steaming the oven as you put the rolls into the oven. Just before baking the rolls, flip them over so they are cut side up. Bake for 15 minutes, turning the rolls half way through the bake. Immediately put the rolls on a cooling rack. You want a crisp and nicely browned crust. More than half of bread's taste is in the crust, and it is developed by browning - don't shortchange yourself on the flavor you can get out of the roll by under-baking it.
There are many ways to enjoy these rolls. Slice them in half horizontally and make sandwiches on them. You can toast or grill the rolls. And you can break the rolls apart and have them with preserves or dip them in oil.
When you say, “Bake for 15 minutes, turning the rolls half way through the bake” do you mean flip the rolls over or rotate the sheet?
Most ovens bake unevenly. Even convection ovens. So, half way through a bake I do a little fire drill. The pans are switched between racks and rotated.
-Mike
These are the closest thing I have found to the “semmel” rolls I remember so fondly from long ago sojourn in Austria. Question – can this recipe be made into a loaf?
Hi Irene,
Thanks for the kind words!
The shape of a loaf is almost always up to the whim of the baker. Rolls, free form loaf, boule, batard, baguette, or sandwich loaf – it almost always works out well. So, feel free to make this into a loaf – just share some pictures please!
-Mike
Mike,
It worked! I cut recipe in half and make a small loaf. I have a photo of the result, but not sure how to attach it to this message of otherwise send it to you.
Irene
That’s great to hear! If you want, you can email me a picture and I’ll try to add it.
Best wishes,
Mike
Hi,
I want to try these out, but I was wondering why such an high amount of sourdough starter? I usually use about 20% starter, will that work here?
Hi Gazelle,
There really aren’t any hard and fast rules about how much sourdough starter to use. Using more, fresh, active, starter gives you a faster rise and a milder taste. We wanted the milder taste for these rolls to let the flavor of the bread flour and malt extract shine through. We didn’t really want a San Francisco symphony of sour for these rolls.
Hope that helps,
-Mike
Hey,
Thanks for replying so fast! What’s ironically funny is that my sourdough starter was founded in San Francisco back in 1956, and here I am in Norway, longing for Vienna, baking Semmels 😂 I used the 20%, and adjusted the percentage accordingly. Excited for the results, thanks for the recipe.
Hi again,
There’s nothing wrong with changing recipes – I often tell people they aren’t your recipe until you change them. With less starter, they will take longer to rise and the sourdough flavor or tang will be more dominant. That’s not a good thing or a bad thing.
On the, “It’s a small world, after all” front. Here in Texas, I am baking a potato bread recipe that I got from a English baker. Who got it from a Russian website. Who got it from a German baker. Bakers share recipes on a knead to know basis. How was the bread you ask? GREAT! I’ll be sharing the recipe real soon now.
-Mike
Mike, Is the Malt Extract referenced here a liquid or powder and is it used as a sweetener or to feed the bacteria in the starter? Thanks
Hi Judy,
I am SO embarrassed. Everywhere else on the site where I mention malt extract I made the term a link to our page about malted barley extract. (Yeah, I checked.) Now in the recipe and here in this note, it is a link.
I hope that information helps you. best wishes,
Mike
Thanks for the quick reply. I’m going to try these as soon as I build my starter back up and get my hands on some barley malt extract.
Hi Judy,
In a pinch, you can use honey, agave syrup or other sweeteners, though they won’t the quite the same.
-Mike
Can these be frozen after they rise for baking later?
Hi Lesa,
We made thousands of these rolls for our commercial clients, but never froze one. We baked them and delivered them the same day. As a result, I can’t give you a definitive and proven answer.
That said, I’ll share comments based on experience with other frozen dough and bread products. My experience is that it is easier to bake breads and rolls, then freeze them, and later re-heat them than to freeze unbaked goods. You can do a par-bake where you bake something about until it is about 80% done and then complete the bake later. Freezing risen or unrisen dough is more problematical. If you make it work, please let me know how you did it.
Best wishes,
Mike
Hello Mike! About how long should the dough proof for?it doesn’t have to be exact, but I’d love to make these during the week but I work overnights so wating it isn’t really an option lol And how many times should you be kneading it? Thanks in advance!
Hi Luna!In my experience beginning bakers want precise guidelines. Such as "how long should the dough rise?" More advanced bakers know that it takes as long as it takes, and that watching the clock instead of the dough is not a good approach. I use a clock more as a reminder than as a overseer of my efforts.
As a result, I tend to not give precise timings on the web page for most processes, instead preferring to have a results based criteria. Your starter may be more, or less, active than mine - perhaps even MUCH more or less active so a 4 hour rise in my kitchen might turn into a 2 or even 12 hour rise in your kitchen. There is also temperature to consider, which can make a huge difference! My current suggestion is to put the dough into a container which is calibrated, such as a Cambro. (Even a new paint bucket with lines you draw on the side will work.) Let the dough rise to 1.4x its original size and then move on. The more traditional "let it rise until doubled" seems to be a recipe for overproofing the dough.
With kneading, I don't count, and have never counted, now many times I knead the dough. I use a timer as a way to gauge how long I've been kneading and look at the dough to see if it looks and feels right. Usually 5 minutes of kneading, a 5 minute rest, and then 5 more minutes of kneading gets the job done. Some doughs need more kneading, some less. We talk about this in the "How to Knead Dough" page.
Fitting bread into ones schedule is not always easy. My usual suggestion is to work out the timings on days when you are not at work. With sourdough, you need to be meticulous in feeding your sourdough so you can have repeatability between batches. You can vary the amount of starter you use, the temperature of the water you use to mix the dough, and the temperature of where you are raising the dough. Once you get things dialed in for your starter, formula, ingredients and kitchen the process should be fairly consistent, at least until the seasons change and you are 40 degrees hotter or cooler - central heat and air conditioning make a bakers life a lot easier.
Good luck,
Mike
Having grown up in NJ, we missed Kaiser rolls. Thank you for this recipe! They came out perfect and taste like home!
Hi Tammie,
Thanks for the kind words! The rolls are a bit of a bother, but they taste SO good!
Best wishes,
Mike
Can these be frozen after they rise for baking at a later time