
Stretch and Fold
Preparing for the Farmers Market
I can't count the number of times that people asked if that stretch and fold thing REALLY works. As luck would have it, my wife had been visiting the bakery one night as I was preparing for the next day's Gunnison Farmers Market and took some pictures of the process. Maybe she wanted some pictures to help her remember what I looked like - the life of a baker's wife can be a lonely one. I recently rediscovered the pictures and find they really put together a great overview of the stretch and fold process. Yes, that's really me, and yes, that's really me preparing for a farmers market.

1. The days before the final push, I do prep work, such as starting pre-ferments, feeding up starters, roasting seeds and such. The reward is seeing a bucket with bulging plastic wrap on it. In this case, a poolish extravaganza. While small mixers really aren't up the workload of making large quantities of dough, I do use my KitchenAid K45S and my Electrolux DLX to mix preferments. Sourdough and poolish have no real load limits in these machines.
Yes, those ARE hardware store paint buckets. They are made from the same plastic as food grade containers. However, for the purpose of ease of documentation, I suggest purchasing NSF certified buckets from a food service industry supplier. They'll be more expensive, but it will be easier to satisfy your health department inspector.

2. I measure the ingredients into more buckets. One bucket is reserved for dry ingredients such as flour, yeast, salt, sugar, and grains. The other bucket is reserved for wet ingredients such as water, starter, pre-ferments, oils, butter, eggs, liquid sweeteners and so on. Having one person measuring while another mixes can get the breads done more quickly. However, when planning your bake, it is important to consider your bottlenecks. We had limited oven capacity. If we rushed at this point, we'd have far too many loaves of bread waiting for an oven at the other end of the evening. I staggered the batches of bread so they'd be ready when there was an oven waiting for them. Of course, there was more scheduling involved because not all breads take the same length of time to prepare. You need to know your kitchen, your breads and your processes. All this comes from experience.

3. I usually add water to the liquids bucket, followed by pre-ferments, eggs, oils and liquid sweeteners. Reserving one bucket for liquids and one for solids makes it easier to empty the buckets. I use the rule of 240, which means some times of the year the water can be very hot or very cold.
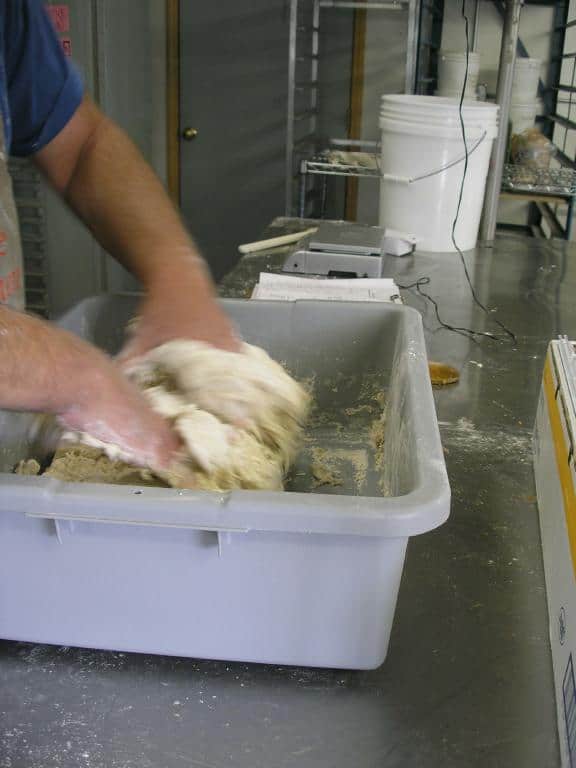
The bakery area where I was working was pretty tight for a photographer to work with - the work table had an upper shelf that really got in the way of the picture taking. I am amazed how well Beth did in getting the important things to show without cutting off part of my head too often.
 4. As mentioned before, we use one bucket for dry ingredients. We measure most ingredients directly into the buckets. We are using shipping scales with a 50lb capacity. We add an ingredient, tare the scales and add the next ingredient.
 5. Yeast, herbs and spices are used in small quantities - but they are critical, so I use sensitive scales to measure them. While this web site is all about sourdough, I make a number of very good yeasted breads for the farmers market. I add the yeast to the dry ingredients and stir it in, as this helps protect the temperature sensitive instant yeast I use from temperature shocks from hot or cold water.
 6. Salt is used in large enough quantities that I just measure it into the dry ingredients bucket.
With the stretch and fold process, ALL ingredients are added at the start of the process. If you were using a mixer, you'd add seeds and grains later in the mix as they could interfere with gluten development. With stretch and fold, this is not an issue, and these ingredients are much more evenly distributed than when using a mixer.
 7. Once measured, the ingredients are added to a bus tub, liquids first. Bus tubs have lots of advantages. They are food safe, the are a convenient size, and they are cheap.
 8. In some cases, the ingredients don't pour very well. Honey and syrups just form sticky masses on the bottoms of the buckets. A plastic scraper can be a great help.
 9. The liquid and dry ingredients are given a very rough mix by hand. The goal is not a well developed dough, just that all the flour be wet. If there are strands of gooey pre-ferments in the dough, that's OK.
 10. Some people have trouble getting their hands into the dough. All I can say is, "just do it - it's only flour, water, salt, and leaven, it won't kill you!" Doing the stretch and fold mix helped me get over my dislike of wet doughs.
 11. I reach under the ingredients to bring the stuff on the bottom to the top.
 12. This is a fairly quick action.
 13. The goal isn't kneading, the goal is just to get all the dry ingredients wet. Sometimes this looks like kneading, however it doesn't take nearly as long. In another kitchen, my wife measured while I mixed. I was usually waiting for her to finish measuring - and she was very fast at measuring. Often the most effective mixing approach is to open ones hand in the dough, clench the hand into a fist compressing and mixing the ingredients, and then repeating.
 14. I'm about done mixing at this point. The dry ingredients are wet, however the dough is very, very rough looking. And that's OK. This is about a 10 or 12 loaf batch
 15. When these pictures were taken, we were in the mountains of Colorado, where the humidity was so low that any dough left unprotected dried out. I covered dough with plastic film. You could use food safe trash bags, oil cloth, or any of a large number of things that would keep air and pests out of the dough.
 16. A close-up picture of some rough, ugly dough. It didn't really need to be this well developed, but I find plain doughs require more work to get to the point where all the flour is wet than doughs with grains, seeds or other aggregate in them.
 17. One other advantage of bus tubs is they fit nicely onto bakers racks. This makes it easy to move a lot of dough around the bakery. Each rack can hold 5 or 6 tubs of dough, and each tub can hold up to 22 loaves worth of dough.
 18. With no further work on my part, the dough is already looking better than when it was put on the rack.
 19. It may not be very glamorous, but we uncover the dough and plop it onto a work surface. Some doughs stick to the bus tub, and they can be helped along with a dough scraper or fingers.
 20. The dough awaits. The only doughs that seem to rise during the stretch and fold process are heavily yeasted ones. However, the riser is definitely active during this time.
 21. I reach under the dough to more tease it out than stretch it. It is important to reach under the dough to really stretch it and develop it. Some people only press on the dough from the top but that only develops the dough on the top. Reaching under the dough develops the entire mass of the dough.
 22. The dough is stretched in all directions until it is about 1/3 as high as it started out. While the dough looks better than it did, it still isn't very pretty.
It is at this point where any lumps of dry stuff remaining in the dough should be found and mashed out of existence. Or, it's time to frissage.
 23. The dough is folded like a letter, 1/3 is folded down from the top.
 24. It tales a bit of doing to get the dough folded down.
 25. The folding continues with the bottom being folded up.
 26. Then the right is folded to the center
 27. And the left is folded on top of that.
 28. After the final fold, the dough is put back into the bus tub. The dough is still pretty rough, but it is coming along.
 29. What a difference an hour makes! The dough has relaxed, spread out a bit and become much more homogeneous.
 30. This time the dough is a bit stickier, so it needs a bit more persuasion to come out of the bus tub.
 31. After a second hour in the bus tub, the dough has become as well developed as most doughs are when they are mixed in a machine.
 32. Yes, we stretch again, however this time it's easier. (Though that may not be true for you and your dough.)
 33. Once we've stretched, we fold again. Stretch and fold. It's not just a catchy name.
 34. As we do the stretch and fold, the dough improves dramatically.
 35. We fold over the tube of dough.
 36. Once folded, the dough is ready to go back into the tub.
 37. We're about to do our last stretch and fold on this dough!
 38. For most doughs, we do three stretch and folds, followed by a rest period as long as the time between the stretch and folds. Different doughs may benefit from more, or fewer, cycles. Some may prefer more, or less, time between cycles. The important thing here is to pay attention to the dough and see what it wants.
 39. The dough is stretched.
 40. And the dough is folded.
 41. And then the dough is folded again
 42. The dough is ready for a last rest, after which it will be ready to be scaled and loafed.
After that last stretch and fold, I let the dough rest again for the same amount of time I give the dough between stretch and folds. Then it is time to scale the dough, round the dough and let it rest for 10 to 30 minutes. At the end of that time, final loafing, a rise and a bake are in the dough's future. I hope the stretch and fold pictures have helped aspiring farmers market bakers on a budget.
Kudos for your wife, Mike. (well to you and Craig too). Even though we’re dependent on our mixer, this makes me want to add a step to our more obstreperous doughs.
Very helpful information and photos. I hope to give this a try soon.
Hi Ronda,
Please let us know how it turned out!
-Mike
I’m looking so forward to trying this!! I need to wait a bit until my sourdough starter has gotten a little older 🙂 but, I’m thinking, hoping, my hands, arms, shoulders… ok, so my whole body… will be able to do this. I definitely want to get the literal feel of the dough, to be sure I’m learning what I’m really looking for.
I had a starter years ago, it seemed happy, but during the rise before baking it suddenly got enormous!!!! like, almost didn’t fit on the stone it had been resting on and would bake on. but, then it seemed to fall just as suddenly and basically made a cracker???? the starter also exploded all over in the fridge and I was smelling and finding bits of it for months after during full fridge cleanings????????????♀️ so, i took a break.
But, after my last surgery disaster, I’m way more homebound and useless. But we love sourdough, but not the cost, and that’s only of we can even find any in our small town.
So, I started a new starter:) although I’m nervous my body may not allow the 2 feedings 12hrs apart, as my body is not very predictable. But, I used to LOVE baking of all kinds, making candy.. well, mostly lots of flavors of caramels… and more… but I’ve not been able to do any of that. But I feel I’ll burst if I don’t, so, with all your help through this site and loads of info out there (granted, more info is definitely not always better????) I’m determined to have the ability to bake us some bread whenever we’d like… plus all the other yummy things to use it in!!
Thank you, all of you, for all the effort to do this! visuals are so important!!! for me at least???? otherwise I tend to forget or not grasp what is being explained. so, thanks again!
so sorry for the long comment???? I’m an overthinking over-explainer, as you can see????
Hi Jade,
Perhaps you are overthinking things just a bit. It happens to all of us. You might want to sit down and take a deep breath or two. And then focus on how easy it can be to bake, and dive into with the goal of enjoying it. Some people expect a perfect loaf the first time, and every time thereafter (which isn’t going to happen!) and some of the pictures you see on social media are intimidating. Just start small and grow. One blogger calls this 1% to infinity. If you improve 1% per day, pretty soon you won’t believe where you’ve gotten!
I don’t know what your medical issues are, and wouldn’t dream of asking, so I’ll give you some general suggestions that have worked for our students who have had medical issues. I am firmly convinced that almost anyone can bake great bread!
Feeding a starter twice a day is annoying. Unless you have the patience of a saint and the persistence of a big cat on the hunt, there is no other way to put that. However, twice a day doesn’t mean 12 hours apart. It’s more like more or less 12 hours apart. It doesn’t mean that you have to feed at 6 AM and 6 PM. If you’re an early bird, that’s an OK schedule. If you’re a night owl 10 AM and 10 PM works as well, the starter doesn’t care. If you work out of the home and can’t get back in 12 hours, a few hours late is OK. Once you have a good starter, you can refrigerate it and feed it a few days before when you want to bake rather than feeding it every bleeping day. Also, it’s OK to switch your schedule. 6 and 6 today and 10 and 10 tomorrow is fine! It’s not rocket science!
A hurdle for many people is kneading the dough. Many students have warned us they couldn’t knead because of carpal tunnel syndrome or other issues. Our gentle way of kneading worked for all our students who found they could knead easily and well. We cover that in our “How to Knead Dough” page.
Some folks still can’t knead. And that’s OK, we have another trick up our sleeves, the stretch and fold technique. It’s easy, and there is little hands on time with the dough, although the stretch and fold process does stretch out into a number of hours. For details on how to stretch and fold dough, you might check out our “Stretch and Fold” page.
The next stumbling block many starting bakers face is time. How long will it take to rise? How long can it stay risen before I have to bake it? Can you be more precise? Sadly, cookbook authors and web authors can be very precise, but not very accurate. There are so many variables that make bread rise differently in your kitchen than in ours. Strength of your starter, kitchen temperature, kind of flour and on and on. The biggest hint I have is to bake a recipe for the first time on a day off work. If it takes longer than expected, that will be OK. If it takes less time than expected, that will also work out.
One cool thing about being a baker is that we can control time! Well, not really, but we can make bread rise faster or slower to shoehorn rise time into a manageable time frame. If you want your dough to rise more quickly, you can use more starter, raise the dough in a warmer area, make the dough wetter or some combination of these options. If you want the dough to rise more slowly, you can use less starter, raise the dough in a cooler area, make the dough dryer or some combination of these. We talk about slowing the rise in our “Retarding Dough for Flavor Enhancement and Process Control” page.
Well, when is the darned thing ready to bake? If you bake it too soon, you’ll get tremendous oven spring and a loaf can even tear itself apart. If you bake a little too late, you might miss out on oven spring altogether. And if you bake a lot too late, the loaf can collapse. With all things bread related, I prefer to look at the loaf rather than the clock. When someone says it will take SO long to rise, I take that as the barest starting point. I like to press the dough gently with a fingertip. If the dough springs back at once, it needs to rise longer. If it doesn’t spring back at all, it has over risen and should be baked at once. I look for a dough that springs back slowly.
How to bake a loaf? More often than not when baking in a simple bread pan or a naked bake, I find 375F for 45 minutes works well. I turn the bread half way through the bake.
We have some painless tutorials on the web page. One is an “Introduction to Bread Making” aimed at people are between never ever baked before and never ever baked successfully. It takes you through the basics of baking and three different bread recipes, each of which will teach you another aspect of bread making. The next tutorial is our “Fast Track to Sourdough Baking” which takes you through the basics of sourdough and two good recipes.
Hope this helps!
-Mike